Intro
Running your own homelab is something that I truly believe is important not only for your personal life (and those in it) but also for your career development.
I guess you could say my self-hosting journey started when I was just a kid hosting game servers so I could play games with my mates. That then progressed to running a media server and Home Assistant on a first-generation Raspberry Pi. I even ran OctoPrint to remotely control my first 3D printer and delved deeper into Home Assistant, which led to creating my own IoT devices from ESP8266’s. Without self-hosting and running a homelab, I would not have been able to go down these rabbit holes. At the end of the day, having a homelab provides the freedom and access to do what you want.
Hardware

The homelab has evolved over time, but after some recent additions, I think I will be happy for a while. I have no plans to bring a 19-inch rack into my home; I prefer an energy-efficient and compact setup.
NAS
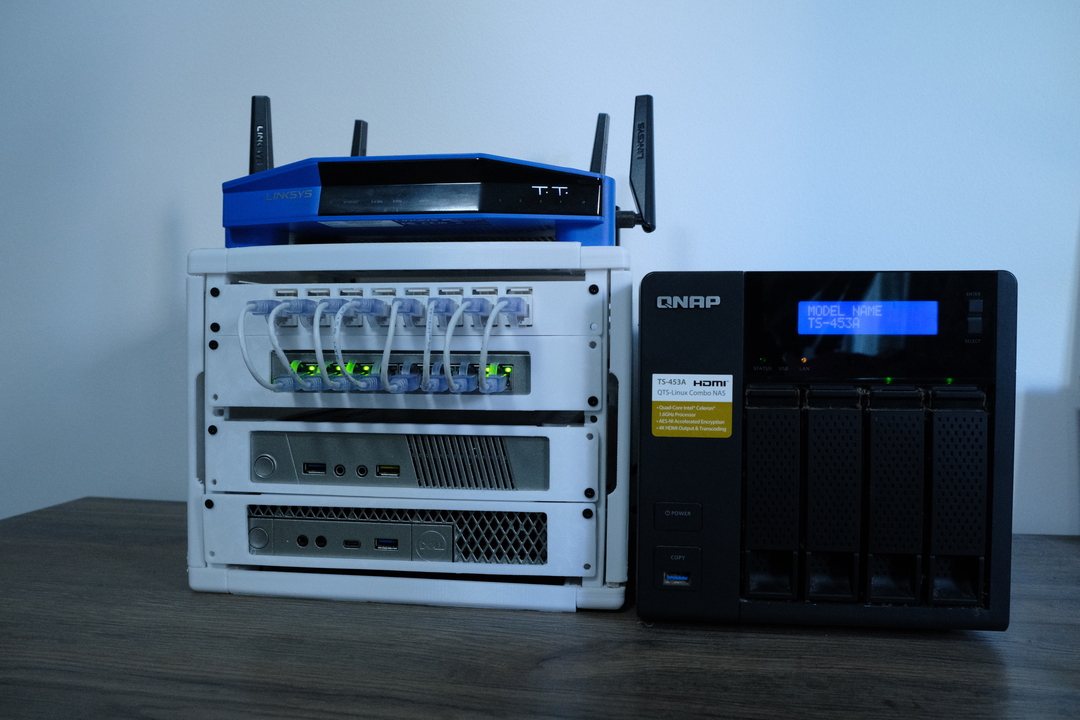
The Network Attached Storage (NAS) server is the backbone of my lab and is actually the oldest component in the lab, purchased with my first paycheck from my first job back in 2016. It is a QNAP TS-453A, which back in 2016 was pretty impressive. Not so much today, but I have no plans on upgrading as it gets the job done, which is to store files and run a media server.
Compute
For compute, I have two mini PCs. The first is a Lenovo M93p Tiny, with an i5 4570T, 8GB of RAM, and a 250GB SSD. The second, a recent addition, is a Dell Optiplex 7060, with an i5 8500T, 16GB of RAM, and 128GB of storage. The Dell was purchased to be used as a dedicated Kubernetes lab, with the Lenovo running the majority of the software in the homelab.
I chose this form factor for two main reasons: being compact and energy efficient. Since these run 24/7, energy efficiency becomes a factor in the decision-making. These machines are perfectly capable of running the workloads I want and are easily upgraded (CPU, RAM, storage). You may have noticed the lack of storage; that is because I use the NAS for storage, so I don’t need to store much data on these nodes. In the future, I’d like to replace the M93p Tiny with an Optiplex for the improved performance across the generations or even something like the NUC form factor when the prices get lower. Both the Lenovo and Dell were purchased used on eBay for a reasonable price.
Switch
The switch I’m running is nothing fancy; it is a Netgear GS108, which is an 8-port Gigabit switch.
Router
I’ve been using a Linksys WRT1900AC for a very long time now and can’t complain. In the future, if I go down the Ubiquiti route, I’d separate the router from the wireless access point by using something like the Edge Router and u6 plus as an access point.
Rack
The rack ties the homelab together and, when things start to get complicated, is used as a way to organize everything and stop the other household members from complaining about the bunch of computers with a rat nest of wires.
When looking for rack solutions, I wanted something small and compact for my use case. Unfortunately, the solutions were too expensive to justify; I could buy another Optiplex for the price of a rack! I have a 3D printer and know CAD, so I thought, why not design my own rack and print it? When looking for inspiration, I found a post for Rack Stack on the homelab subreddit and threw out that idea. I instantly went to AliExpress and started ordering all the hardware I would need (I should have ordered more; you can see the missing screws on the front panels) and ordered some white PETG from Siddament. I was able to use one of the existing Rack Stack profiles and edited the OpenSCAD files to create the mounts for the Lenovo, Dell, and switch. I modified the patch panel definition files to center the ports, which I think looks a lot cleaner, and also made the side walls solid as this setup does not generate a lot of heat.
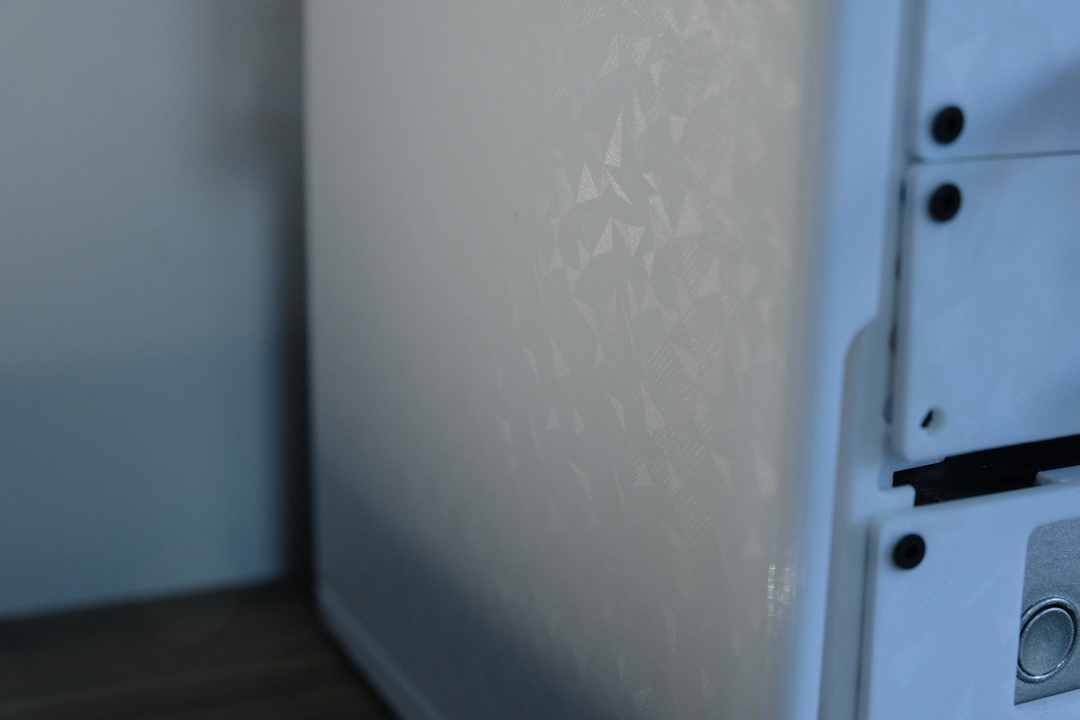
Overall, I would say Rack Stack is a great project and easily extensible due to how jazwa has written the OpenSCAD definitions. I did have issues printing and assembling it, however, but I think I only have myself to blame. I printed it on my Bambu Lab X1 Carbon using a 0.6mm nozzle where I think the project was designed for a 0.4mm nozzle. The project comes with calibration prints, but I should have done more iterations calibrating the tolerances built into the models’ definitions. Printing the whole rack in PETG did lead to some of the larger parts warping and, due to my tolerances being off, I had to use a soldering iron to set the nuts in place. I printed the parts on a PEO plate to get a cool pattern. However, with the plastic being white, it is very subtle, and you need the correct angle and lighting to see it. Below is a picture. To make the build cleaner, I gave the mini PCs and the switch a couple of coats of metallic spray paint.
Software
Starting with my homepage I am using homepage for a single pane of glass view over the entire lab.
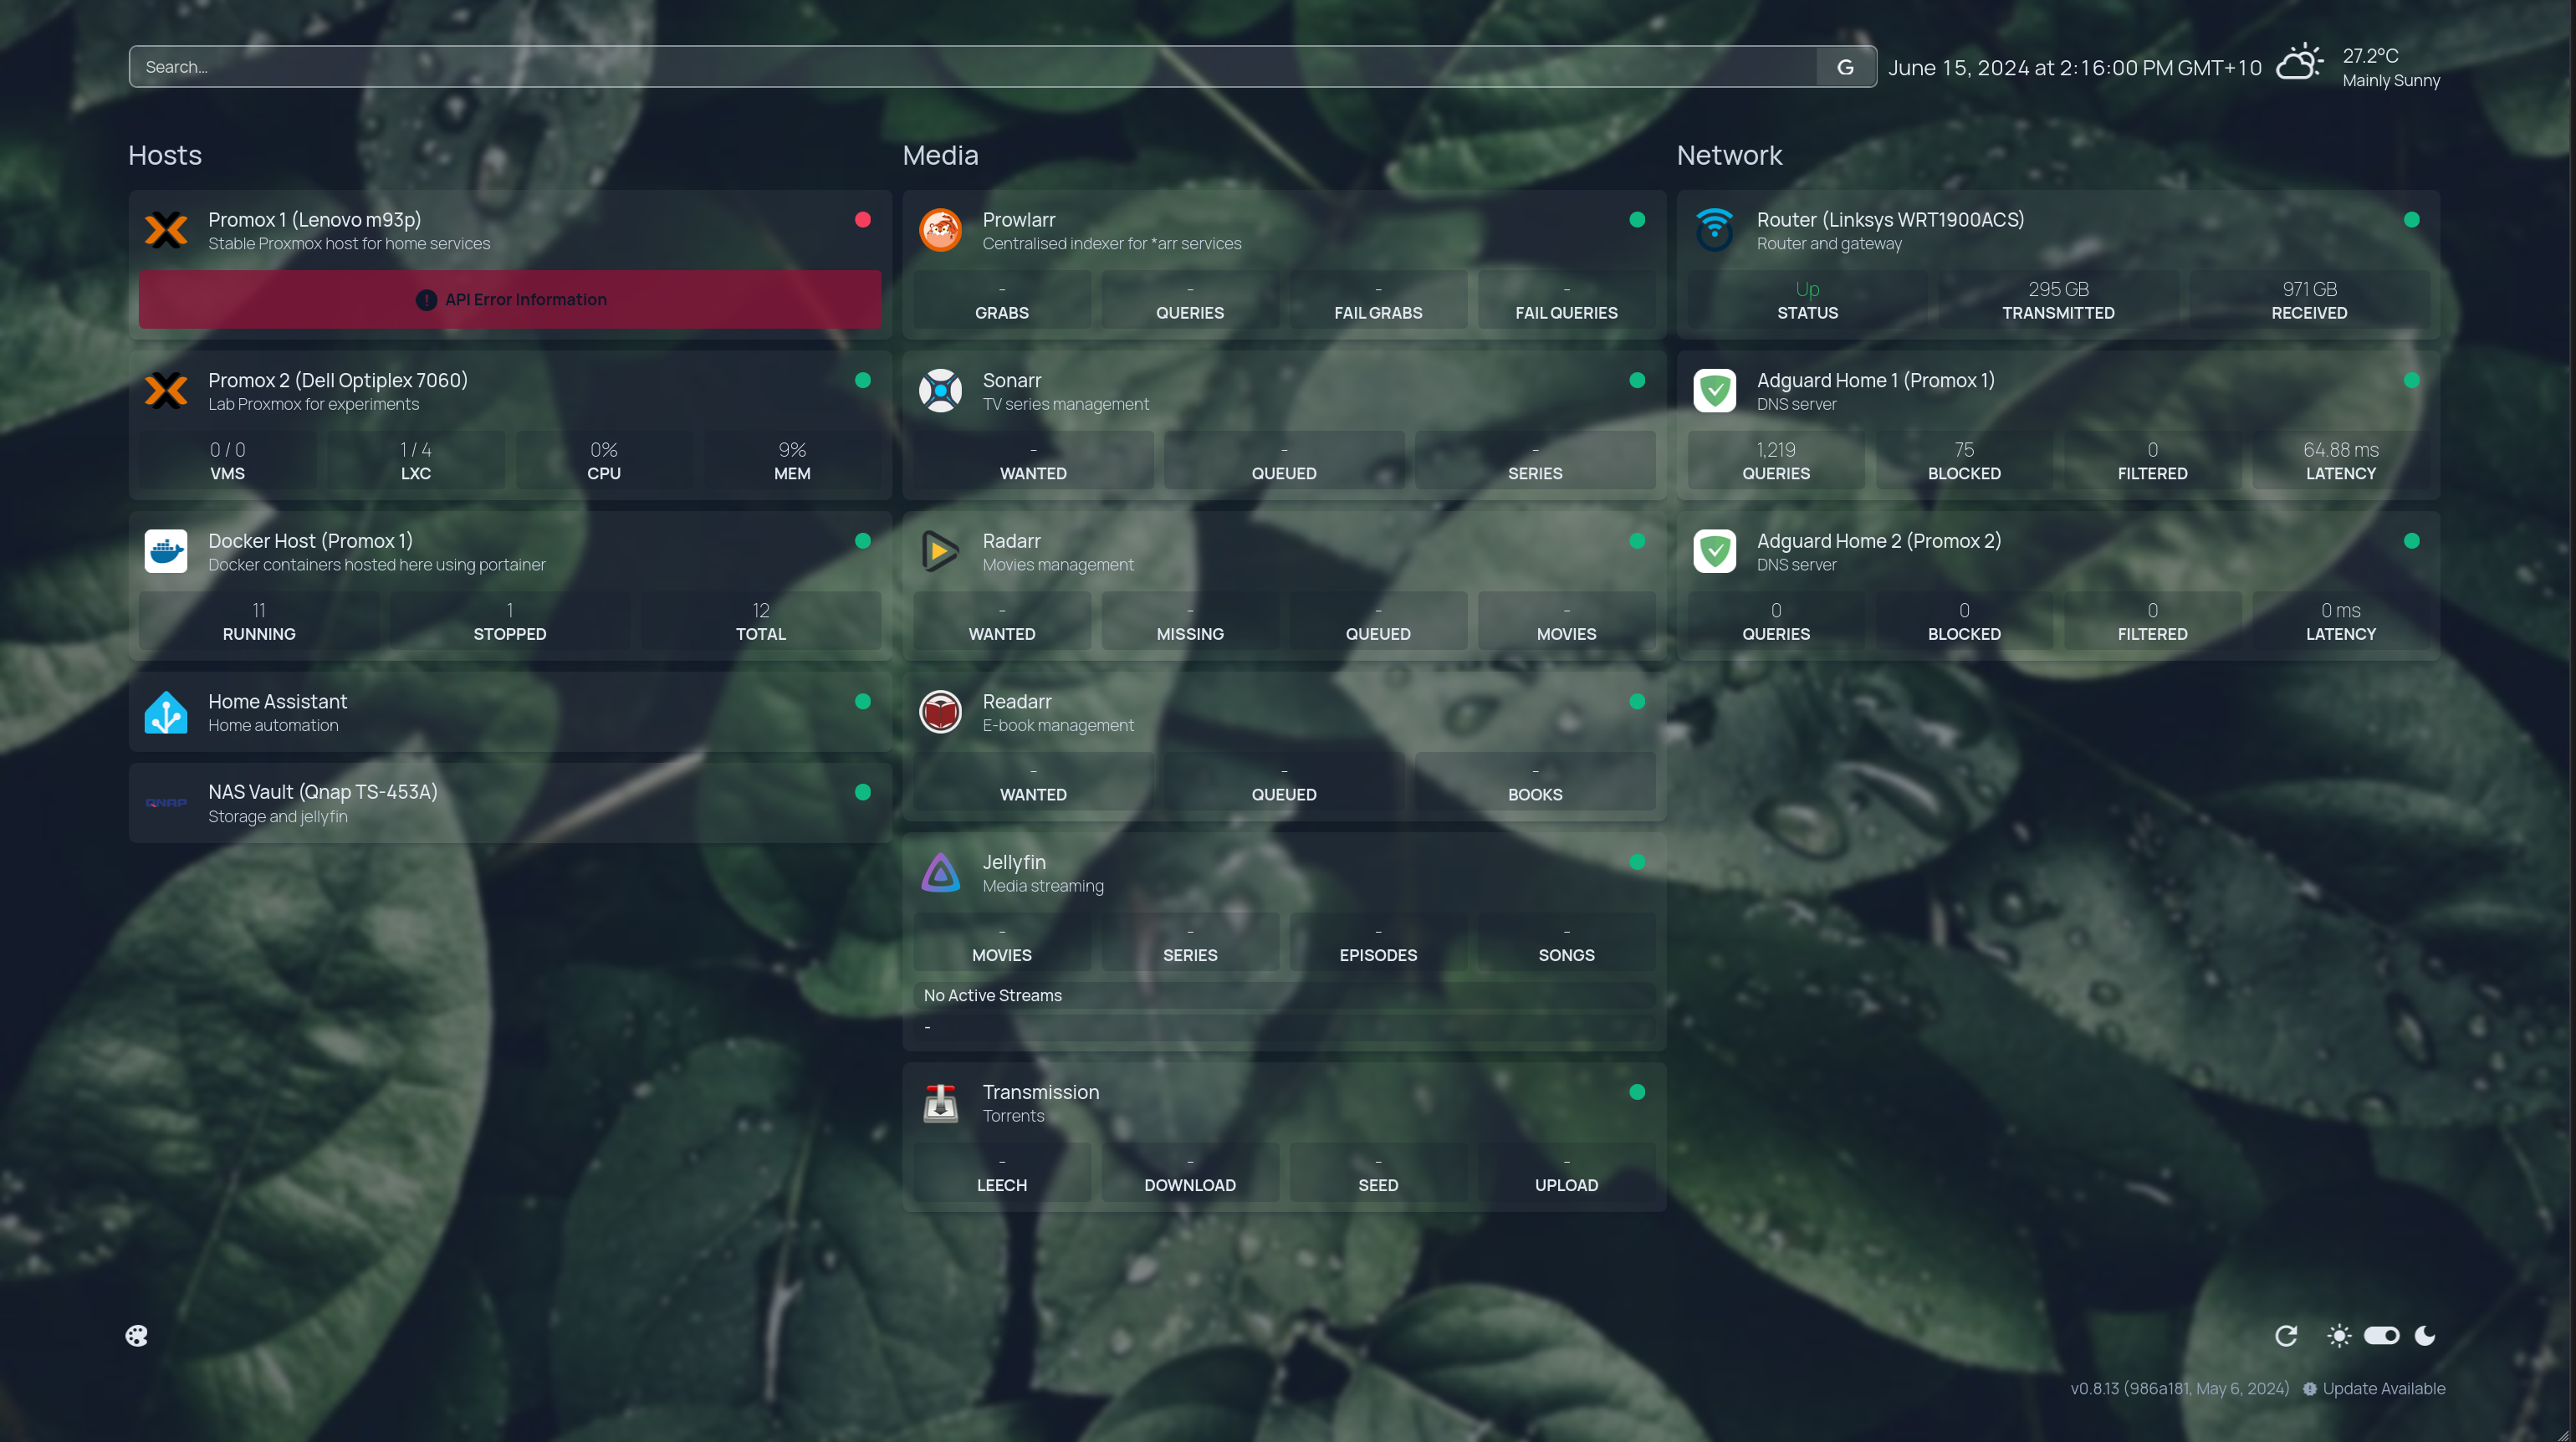
The NAS runs all my file-related operations, such as file synchronization between my phone and computers as well as backing itself up to the cloud. The NAS also runs jellyfin in a docker container.
The Lenovo and Dell are both running Proxmox for my virtualization needs. I run a mixture of LXC and virtual machines (Home Assistant) in the environment.
Both the Lenovo and Dell run AdGuardHome in an LXC container, and by using keepalived to provide a virtual IP and adguardhome-sync to sync configuration between the two DNS servers, I have a highly available DNS server that blocks ads and malware across the whole network and DNS rewrites for internal hosts. The Lenovo also runs my “dockerhost” in an LXC container with portainer, which runs the majority of the services, which are:
- adguardhome-sync
- homepage
- the *arr stack
- transmission
- WireGuard server (VPN into the lab)
- WireGuard server (VPN out of the lab)
- cloudflarea-ddns (Dynamic DNS using cloudflare)
The Dell’s main purpose is to run a Kubernetes cluster, and to do this, I created an LXC template with k3s installed, so I can easily add nodes to the cluster. This is a playground, so having all the nodes on the same machine is ok. Having a Kubernetes cluster running at home allows me to experiment with different tooling and learn about different concepts without having to worry about a bill from a cloud provider. I can take this knowledge and apply it at my work.
Lastly, the firmware running on the router is OpenWrt, which is an open-source project that enables custom firmware on consumer routers, providing advanced configuration capabilities and a vast array of additional features not available in the stock firmware. This allows me to have greater control over my network and experiment with networking features and security measures.
Summary
I hope you enjoyed getting a glimpse into my homelab and how easy it is to get started. Even a couple of Raspberry Pi’s can be a great starting point if you are energy-conscious and okay with running your workloads on ARM. As mentioned at the beginning, having some hardware running at home is incredibly valuable, especially if you are into media consumption and storage. At the very least, consider getting yourself a NAS. While maintaining a homelab does require some level of administration, it’s not a significant time investment and provides you with valuable skills that you can utilize in your career.